SETTING UP MQTT BROKER WITH RASPBERRY PI AND CONTROLLING LED WITH MQTT CLIENT

Credits: This tutorial is inspired from my lab module in my uni.Thanks to my lecturer Dr Ejat for teaching me Raspberry Pi and MQTT .

PART 1- INSTALL MQTT FIRST

0.To understand what is mqtt pls watch

1.First step update and upgrade your pi.

2.Install the broker Mosquito and type y

3.Enable the mosquito broker service to be run in the background.

4.Check whether Mosquito is running or not.

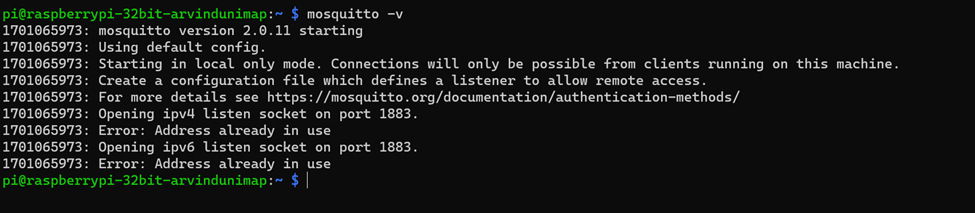
5.After that open mosquito configuration file using the command below and press ENTER.

6.At the end of the code add these two lines so to set listening port for the Mosquito broker and allow non-password access.

7.Press CTRL+X to exit .Press Y and Enter so that the changes will be saved.

8.Restart the mosquitto

9.We are done with setting up in pi .Now we have install MQTTX software in laptop to establsih communication betwwen pi and the laptop.

Download link-https://mqttx.app/

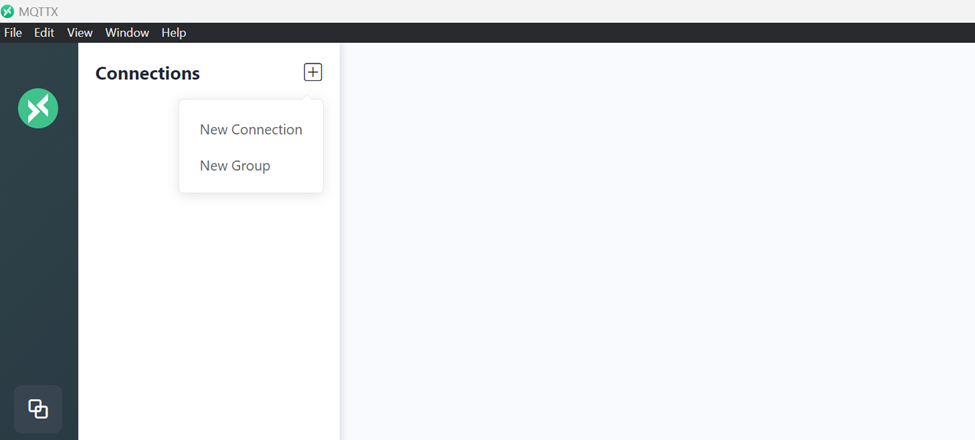
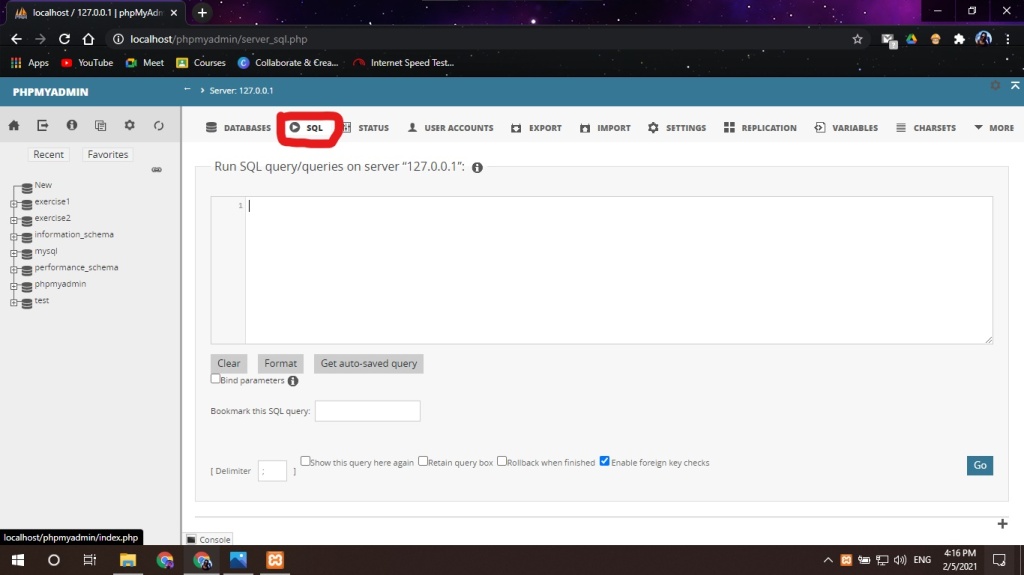
10.Open the software.Click on New connectoon.

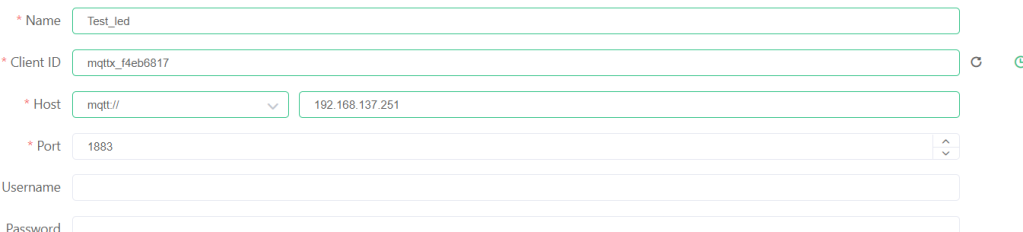
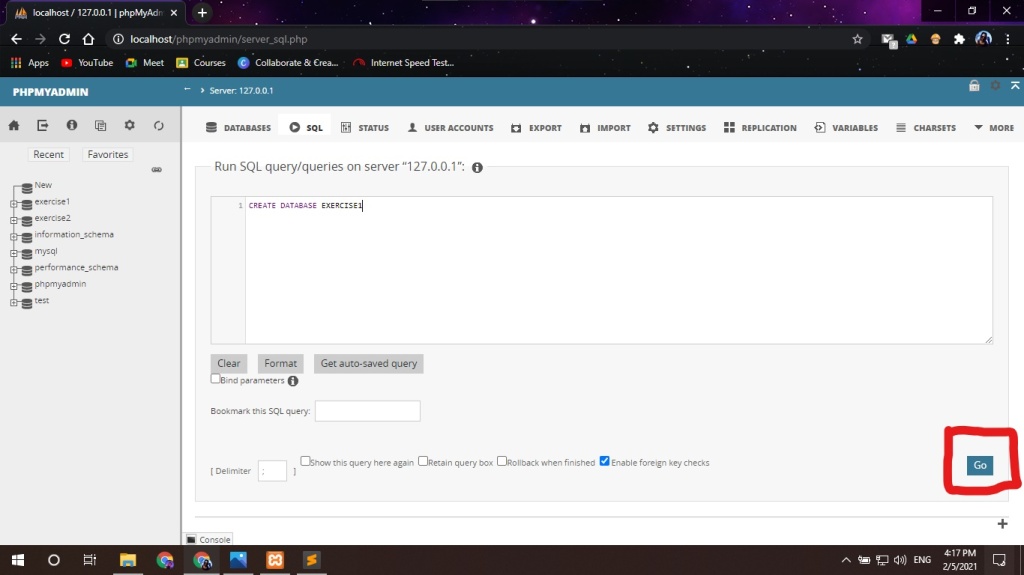
11.Enter the details.Name =any name.Ip address=yours.Client id=any.After that click connect.

12.You can see the connected symbol

13.Click on +NEW Subcription to publish messages.

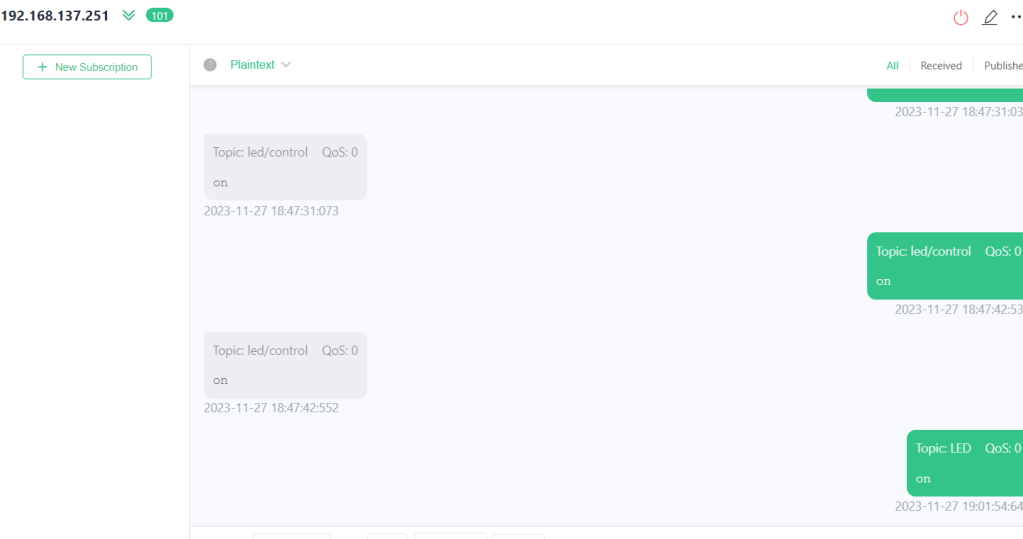
14.Name any name ,mine LED.

15.Topic name is LED.Message =on.


PART 2 – CONTROLLING LED USING MQTTX AND PAHO MQTT

IN THIS PART, WE ARE NOT GOING TO USE SECONDARY MICROCONTROLLER BUT THE PI ITSELF. IN NEXT TUTORIAL , WE WILL DO THAT.

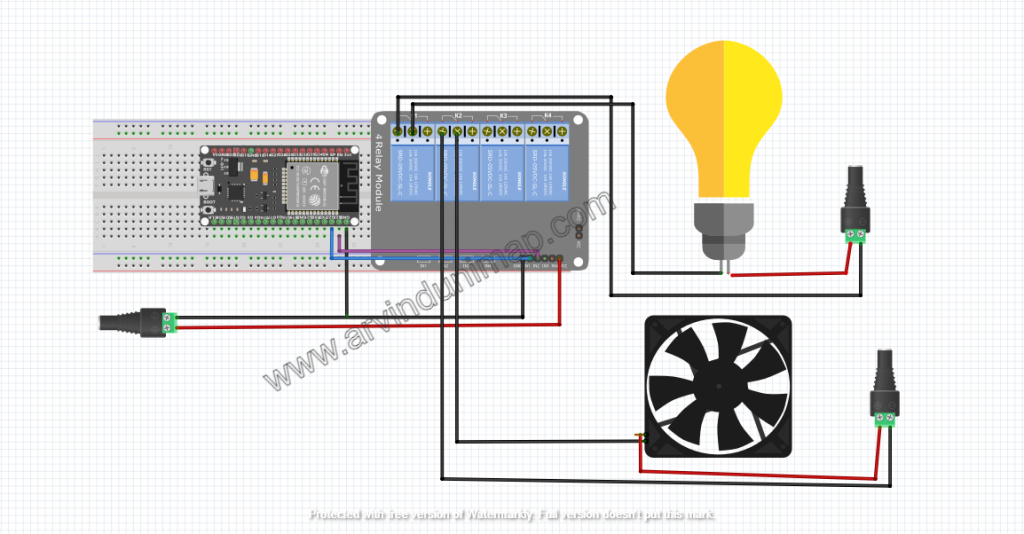
HARDWARE CONFIGURATION

Connect led to GPIO 21 pin 40.Thats all

CODING – replace with your ip address

import RPi.GPIO as GPIO
import paho.mqtt.client as mqtt
import time

GPIO.setwarnings(False)  # Ignore GPIO pin in use warning

# GPIO setup
led_pin = 21  # GPIO pin connected to the LED (change to your pin number)
GPIO.setmode(GPIO.BCM)
GPIO.setup(led_pin, GPIO.OUT)
GPIO.output(led_pin, GPIO.LOW)  # Ensure the LED is initially off

# MQTT settings
broker_address = "192.168.137.251"  # Raspberry Pi IP
client = mqtt.Client("LED")  # Client name

# Callback function to handle MQTT messages
def on_message(client, userdata, message):
    msg = str(message.payload.decode("utf-8"))
    print("Received message: " + msg)
    if msg == "on":
        GPIO.output(led_pin, GPIO.HIGH)  # Turn on LED
    elif msg == "off":
        GPIO.output(led_pin, GPIO.LOW)  # Turn off LED

# Connect to MQTT broker and subscribe to LED topic
client.connect(broker_address)
client.subscribe("LED")
client.on_message = on_message
client.loop_start()

try:
    while True:
        time.sleep(1)
except KeyboardInterrupt:
    GPIO.cleanup()
    client.disconnect()
    client.loop_stop()


OUTPUT

1.USING LAPTOP

MQTTX CONFIGURATION IN LAPTOP

2.USING PHONE

MQTTX CONFIGURATION IN PHONE

IMPORTANTN NOTE :YOU CAN ONLY CONNECT ONE MQTT CLIENT TO ONE BROKER WITH THE CODING ABOVE


TO CONNECT TWO MQTT CLIENT TO ONE MQTT BROKER YOU HAVE TO USE SEPARATE MQTT CLIENT ID.

IN LAPTOP I USED TOPIC LED , MESSAGE =ON

IN PHONE, TOPIC LED2 , MESSAGE =OFF

OUTPUT

THE CODE IS BELOW:

import RPi.GPIO as GPIO
import paho.mqtt.client as mqtt
import time

GPIO.setwarnings(False)  # Ignore GPIO pin in use warning

# GPIO setup
led_pin = 21  # GPIO pin connected to the LED (change to your pin number)
GPIO.setmode(GPIO.BCM)
GPIO.setup(led_pin, GPIO.OUT)
GPIO.output(led_pin, GPIO.LOW)  # Ensure the LED is initially off

# MQTT settings
broker_address = "192.168.137.251"  # Raspberry Pi IP

# First MQTT client (LED)
client1 = mqtt.Client("LED")  # Client name for LED 1

# Second MQTT client (LED2)
client2 = mqtt.Client("LED2")  # Client name for LED 2

# Callback function to handle MQTT messages for LED1
def on_message_led1(client, userdata, message):
    msg = str(message.payload.decode("utf-8"))
    print("Received message (LED1): " + msg)
    if msg == "on":
        GPIO.output(led_pin, GPIO.HIGH)  # Turn on LED
    elif msg == "off":
        GPIO.output(led_pin, GPIO.LOW)  # Turn off LED

# Callback function to handle MQTT messages for LED2
def on_message_led2(client, userdata, message):
    msg = str(message.payload.decode("utf-8"))
    print("Received message (LED2): " + msg)
    # Process messages for LED2 (add your logic here)

# Connect LED1 to MQTT broker and subscribe to LED topic
client1.connect(broker_address)
client1.subscribe("LED")
client1.on_message = on_message_led1
client1.loop_start()

# Connect LED2 to MQTT broker and subscribe to another topic (customize as needed)
client2.connect(broker_address)
client2.subscribe("LED2_TOPIC")  # Subscribe to a different topic for LED2
client2.on_message = on_message_led2
client2.loop_start()

try:
    while True:
        time.sleep(1)
except KeyboardInterrupt:
    GPIO.cleanup()
    client1.disconnect()
    client1.loop_stop()
    client2.disconnect()
    client2.loop_stop()


THANK YOU FOR READING

for any queries contact me at https://wa.link/ctghed

SEM 4- Diploma Computer Engineering

1.MATHS-https://drive.google.com/drive/u/0/folders/1iPijA1zegym4SAl4gAxM8Ul2SHp_I0J6


2. INDUSTRIAL SAFETY

https://drive.google.com/drive/u/0/folders/1NceTAkI-iNRFLPKEjZwh-IOUX1UnCEHR


3.EE-https://drive.google.com/drive/u/0/folders/1F10SPPGuPhB9DPEyImUyFyy1ipsHLimB


4.CS-https://drive.google.com/drive/u/0/folders/14h6eGuKnn4ipQci1jsTVsi08i412spTG


6.OS-

https://drive.google.com/drive/u/0/folders/1nVfht2w-MB6kgUmZiGQYHYd1ymCLmN84


7.DATA COM-https://drive.google.com/drive/u/0/folders/1mwAKbLqNgSIG4Ev3H2yS3Grl3gmBRXEL


MICROELECTRONIC ENGINEERING

PAST YEARS

1.ANALOG ELECTRONIC 1

https://drive.google.com/drive/folders/1ZPWhjD04M6OfPOYRJsVVVyWqydROW7hU?usp=share_link

2.DIGITAL ELECTRONIC 1

https://drive.google.com/drive/folders/1Xt1fIVl1bMmUp42DngRUWUEZMMk7PE6y?usp=share_link

3.COMPUTER PROGRAMMING

https://drive.google.com/drive/folders/1xi0OTr6iaRNAOtDV-1G7RPVQxHPmj7Cp?usp=share_link

INTERNATIONAL BUSINESS (PAST YEARS)

SEM 3

1.HUMAN RESOURCE MANAGEMENT-

https://drive.google.com/drive/folders/1DPtm-_-Yc1sbD_TmLrghaXd2Alqx3H58?usp=share_link

2.INTERNATIONAL BUSINESS MANAGMENT-

https://drive.google.com/drive/folders/1uG2KMvi-4_3emaQVcj7VTyUvsG5X2Xnd?usp=share_link


3.BUSINESS LAW AND ETHICS-

https://drive.google.com/drive/folders/1-KvFpxkdCA9RlaXMjguRlaCzTeyOF62n?usp=drive_link

4.ETHNIC RELATION-

https://drive.google.com/drive/folders/1WY__dqQKgmr1C98BiyxO5_BZ5ONR4ozx?usp=drive_link

5.ORGANIZATIONAL BEHAVIOUR-

https://drive.google.com/drive/folders/1RKvHeVW9LgfoIjcSxxve_azIjgKQKGxc?usp=drive_link

6.SERVICES MARKETING-

https://drive.google.com/drive/folders/1jESCnuKlzss9-GRKf2jAOYQjgoGkiua-?usp=drive_link

MUET SAMPLE QUESTIONS 2021-2022


HOW TO SUBSCRIBE ? SEE BELOW

1.Enter your email and click Follow

2.Open your gmail inbox and click confirm to follow our blog

3.Congrats you are a subscriber now

C PROGRAMMING BOOK-TUTORIALSPOINT

Hi I have uploaded C Programming Book pdf .You can check at this link –https://arvindunimap.wordpress.com/blog-2/sem1-computer-engineering/ under programming section

OR you can download here at

Phone
PC

BLINKING LED | ESP 8266 | TUTORIAL

Click to see the output.

1.Before proceeding you need to install Arduino Ide and also CH340 Drivers for Esp8266.

Arduino Ide-https://www.arduino.cc/en/software

CH340 Drivers-https://learn.sparkfun.com/tutorials/how-to-install-ch340-drivers/all

2.Add this link in  http://arduino.esp8266.com/stable/package_esp8266com_index.json File/Preferences


3.Install board manager for Esp8266 in Tools/Board Manager and search for esp8266.

4.Coding:

/*
  ESP8266 Blink by Simon Peter
  Blink the blue LED on the ESP-01 module
  This example code is in the public domain

  The blue LED on the ESP-01 module is connected to GPIO1
  (which is also the TXD pin; so we cannot use Serial.print() at the same time)

  Note that this sketch uses LED_BUILTIN to find the pin with the internal LED
*/

void setup() {
  pinMode(LED_BUILTIN, OUTPUT);     // Initialize the LED_BUILTIN pin as an output
}

// the loop function runs over and over again forever
void loop() {
  digitalWrite(LED_BUILTIN, LOW);   // Turn the LED on (Note that LOW is the voltage level
  // but actually the LED is on; this is because
  // it is active low on the ESP-01)
  delay(1000);                      // Wait for a second
  digitalWrite(LED_BUILTIN, HIGH);  // Turn the LED off by making the voltage HIGH
  delay(2000);                      // Wait for two seconds (to demonstrate the active low LED)
}

5.Output:


SUBSCRIBE TO ARVIND’S BLOG FOR MORE IOT PROJECT TUTORIALS


THANK YOU FOR VISITTING.


SMART HOME USING GOOGLE ASSISTANT | BLYNK | ESP 32 | WIFI + BLUETOOTH

YOUTUBE -COMING SOON..

CIRCUIT DIAGRAM

GOOGLE ASSISTANT CODE-UPLOADING SOON..SUSBCRIBE TO GET NOTIFIED

BLYNK-PROJECT CODE


DM FOR PROJECT CODE +6011 16271735 @ https://wa.link/59f0x0

HOW TO SUBSCRIBE ? SEE BELOW

1.Enter your email and click Follow

2.Open your gmail inbox and click confirm to follow our blog

3.Congrats you are a subscriber now

RASPBERRY PI GOOGLE HOME-IOT BASED AI SPEAKER

YOUTUBE VIDEO


PROJECT POSTER


SUBSCRIBE TO GET INSTANT UPDATES ABOUT OUR PROJECTS


HOW TO SUBSCRIBE ? SEE BELOW

1.Enter your email and click Follow

2.Open your gmail inbox and click confirm to follow our blog

3.Congrats you are a subscriber now

HOW TO CODE IN MYSQL |BASICS | XAMPP

  1. Open XAMPP application

2. Start Apache and MySQL Service. Then click Admin for MySQL.

3. Your Browser should pop-up and MyPHPAdmin main page should be loaded at your your browser.

4. Click SQL to open SQL editor.

5. Here we gonna edit some code to make a new database, table and insert value inside the table.

For the first example let’s take a look at an image with the example of a table that needed to be created using SQL code

  1. We need to create a Database and we are gonna name it as Exercise 1. Type this code in SQL editor and press Go.

CREATE DATABASE EXERCISE1

2. Create a table by declaring your variable and its type. Here an example of the code

CREATE TABLE STUDENT
(
NAME VARCHAR(25),
IC_NO VARCHAR(12),
STUDENTID INT(9),
GROUP_NO VARCHAR(2),
DATE_ VARCHAR(12)
);

Here the NAME, IC_NO, GROUP_NO and DATE_ are declared as VARCHAR and set limit for number of characters that it will consists. While the STUDENTID is declared as Integer and set limit for number of characters that it will consists. After inserting this code, click go.

3. Now all we have to do is Inserting value into the table that we just created. Insert the code as following.

INSERT INTO STUDENT
(
NAME, IC_NO, STUDENTID, GROUP_NO, DATE_
)

VALUES
(
‘JAY’, ‘43243232432242’, 192020087, 3, ‘07.07.2001’
)

Here we are telling the compiler that we are gonna insert the value into the variables. Then we are telling the compiler that we are inserting value into the table. After done that now click go.

4. At the side bar expand the database and click at our EXERSICE1 Table. There you will find the table that we just have created with values in.

This guide is sponsored by @ JAY TECH STUDIO

DM us to get all software that fits your need for the most affordable price and PC/Laptop repair. We also offer all types of game that you need. For list of software that we have click the image above. If you have any question or need a software that is not in your list do message us in Whatsapp at the link below.

https://wa.link/fylia3

REAL SMART HOME USING ESP32|BLYNK


Project Code

Dm for code at https://wa.link/59f0x0


Circuit Diagram


SUBSCRIBE FOR MORE REAL WORLD PROJECTS

HOW TO SUBSCRIBE ? SEE BELOW

1.Enter your email and click Follow

2.Open your gmail inbox and click confirm to follow our blog

3.Congrats you are a subscriber now

LIST OF DATABASE SOFTWARES

1.XAMPP-

https://drive.google.com/drive/u/0/folders/1sG7ISV9CiL2D2qD-4Fdt3jA3P02d5QkS


2.NETBEANS

https://drive.google.com/drive/u/1/folders/1soxQgPeOJQEIEA4rO6brOtZJZ6xpazx1


3.NOTEPAD++

https://drive.google.com/drive/u/1/folders/1jHLCgA2uIsUc-LBtB26tT25I8H_e_BQg


4.MYSQL WORKBENCH

https://drive.google.com/drive/u/1/folders/1QB2Oz1mSTCYS6Gpo8VtQyFT9z-35E6MY


5.APTANA STUDIO

…..COMING SOON….


SUBSCRIBE TO GET NOTIFIED WHEN ITS UPLOADED

HOW TO SUBSCRIBE ? SEE BELOW

1.Enter your email and click Follow

2.Open your gmail inbox and click confirm to follow our blog

3.Congrats you are a subscriber now

APP LAUNCH

Android users now can access our website on their phones / tablets.

Iphone users chill down even I am Iphone user haha. I am working on it. So chill guys.

ANDROID APP LINK BELOW

https://drive.google.com/drive/folders/11feIFK-tLNw3abMqWwblWZ5wfGUunJSD

Just download and install normally. If you have difficulyt installing, you can see the tutorial below.Thank you.

INSTALLLATION TUTORIAL-

Tutorial video

MECHANICAL ENGINEERING

1.ENGINEERING STATICS-

https://drive.google.com/drive/folders/1cFS65g_oPC2BmvoL86ThY6KjQXB7PCTK?usp=share_link

2.COMPUTER PROGRAMMING-

https://drive.google.com/drive/folders/1ZZvMtfzwzStHkPPbCHDh8bSkhbw0cstv?usp=share_link

3.FLUID MECHANICS 1-

https://drive.google.com/drive/folders/1W2kVrzVFT8FhJq4rW5B_wUg3pSKGxKfT?usp=share_link

4.ENGINEERING MATHS 1-

https://arvindunimap.wordpress.com/maths/

5.PHILOSOPHY-

https://drive.google.com/drive/folders/1eCFZRFgFMIcF56bM0k_R2XnFsrD–_H4?usp=share_link


HOW TO SUBSCRIBE ? SEE BELOW

1.Enter your email and click Follow

2.Open your gmail inbox and click confirm to follow our blog

3.Congrats you are a subscriber now

UPDATED PAST YEARS-DIPLOMA-SEM 5 !!!

UPDATED SEM 5

1.SOFTWARE ENGINEERING

-2021-TEST
-2021-TEST ANSWERS
-2021-OBE-1-OPEN BOOK
-2021-OBE-2-OPEN BOOK

2.CONTROL SYSTEM

-2021-TEST-1
-2021-TEST2-PART B
-2021-OBE-1-OPEN BOOK
-2021-OBE-2
-2021-CAA2-ASSIGNMENT

Knowledge is Power

Design a site like this with WordPress.com
Get started